Google

Learn Excel from MrExcel Video Podcast

EXCEL FUNCTIONS

Excel Programming

Excel Charting

Excel VBA

Tuesday, April 3, 2007

Prevent Duplicate Entry

How can I make sure that duplicate invoice numbers are not entered?.

In Excel 97, you can use the new Data Validation feature to do this. In our example, the invoice numbers are being entered in column A. Here is how to set it up for a single cell:

  • The next cell to be entered is A9. Click in cell A9, and select Data>Validation from the menu.
  • In the "Allow:" drop down box, choose "Custom"
  • Enter this formula exactly how it appears: =ISNA(VLOOKUP(A9,A$1:A8,1,FALSE))
  • Click the Error Alert tab in the Data Validation dialog box.
  • Make sure that the "Show alert" box is checked.
  • For Style:, pick Stop
  • Enter a Title of "Non Unique Value"
  • Enter a message of "You must enter a unique invoice number."
  • Click "OK"
You can test it out. Enter a new value, say 10001 in cell A9. No problem. But, try to repeat a value, say 10088 and the following will appear:

The final thing to do is to copy this validation from cell A9 to the other cells in column A.

  • Click in column A and select Edit>copy to copy the cell.
  • Select a large range of cells in column A. Perhaps A10:A500.
  • Select Edit, Paste Special. From the Paste Special dialog, select "Validation" and click OK. The validation rule that you entered from cell A9 will be copied into all of the cells down to A500.
If you click in cell A12 and pick Data Validation, you will see that Excel changed the validation formula to be =ISNA(VLOOKUP(A12,A$1:A11,1,FALSE)).
That is all that you need to know to make it work. For those of you who want to know more, I will explain in English how the formula is working.

=ISNA(VLOOKUP(A9,A$1:A8,1,FALSE))

We are sitting in cell A9. We are telling the Vlookup function to take the value of the cell we just entered (A9) and to try to find a match in the cells that range from A$1 to A8. The next argument, the 1, tells Vlookup that when a match is found to tell us the data from the first column. Finally, the False in the vlookup says that we are only looking for exact matches. Here is trick #1: If the VLOOKUP finds a match, it will return a value. But, if it does not find a match, it will return the special value of "#N/A". Normally, these #N/A values are bad things, but in this case, we WANT an #N/A. If we get an #N/A, then you know that this new entry is unique and does not match anything above it. An easy way to test if a value is #N/A is to use the ISNA() function. If something inside the ISNA() evaluates to an #N/A, you get a TRUE. So, when they enter a new invoice number and it is not found in the list above the cell, the vlookup will return an #N/A, which will cause the ISNA() to be true.

The second bit of trickery is in the second argument for the Vlookup function. I was careful to specify A$1:A8. The dollar sign before the 1 tells Excel that when we copy this validation to other cells, it should always start looking in cell of the current column. This is called an absolute address. I was equally careful not to put a dollar sign before the 8 in A8. This is called a relative address and tells Excel that when we copy this address, it should stop looking in the cell just above the current cell. Then, when we copy the validation and look at the validation for cell A12, the second argument in the vlookup correctly shows A$1:A11.

There are two problems with this solution. First, it will not work in Excel 95. Second, the validations are only performed on cells that change. If you enter a unique value in cell A9, and then go back up and edit cell A6 to be the same value you entered in A9, the validation logic in A9 will not be invoked and you will end up with duplicate values in your worksheet.

The old-fashioned method used in Excel 95 will address both of these issues. In the old method, you would have the validation logic sitting in a temporary column B. To set this up, enter the following formula in cell B9: =ISNA(VLOOKUP(A9,A$1:A8,1,FALSE))
Copy this formula from B9. Paste it in cells B2:B500. Now, as you enter invoice numbers in column A, column B will show TRUE if the invoice is unique, and FALSE if it is not unique.

Wednesday, March 21, 2007

PIVOT TABLE

Let's suppose you've compiled a large list of data - for example, sales figures for every product your company makes. But now you're ready to distill some meaningful information from the data. For example, you might want to answer the following questions:
· What is the total sales for each product by region?

· Which products are selling best over time?

· Who is your highest-performing salesperson?

For these and other questions, you can create a PivotTable® report - an interactive table that automatically extracts, organizes, and summarizes your data. You can then use the report to analyze the data - for example, make comparisons, detect patterns and relationships, and analyze trends.

Read on to discover what you can do with a PivotTable report.

Summarize and Analyze Your Data

To see the "big picture" of your data, you can use a PivotTable report to summarize and analyze the data. You can control how Microsoft® Excel 2000 summarizes the data - for example, by sum, average, or count - without entering a single formula.

Add or Remove Data

Not quite enough information in your PivotTable report? For example, maybe you want to include sales figures broken down by salesperson. You can easily add or remove categories of data

Quickly Rearrange the Layout

Not satisfied with the layout of your PivotTable report? For example, maybe you'd prefer to display the salesperson information in rows instead of in columns. The interactive nature of your PivotTable report lets you literally turn the table: you can easily move (or "pivot") the rows and columns to view different summaries of the data.

View a Subset of the Data


Want to filter the data so you can view a manageable chunk at a time? To do this, you can use a page field to break the PivotTable report into separate "pages." Each page contains a subset of the data that's summarized in the PivotTable report.

Are there other reasons to use page fields? If your PivotTable report contains many fields, you can use page fields to keep your report compact and readable. Or, if you're retrieving data from a large, external non-OLAP database, use page fields to limit the amount of data retrieved at a time. That way, you can avoid long waits and memory problems.

Show Just the Details You Want

Want to zero in on specific details in a PivotTable report? You can display or hide items in a row or column - for example, specific products or salespersons. You can also display or hide details about items in row or column.

Friday, March 2, 2007

CONDITION FORMATING

Conditional formatting is one of my favourite Excel facilities, and I use it prolifically to help identify the key information in my worksheets (to be honest, I probably over-use, but that's my style!).

This page explains the basic principles of conditional formatting, and then shows a few specific examples that I have regularly used. The page is structured as follows

Basic Principles
Row Striping
Column Striping
Identifying Top 3 In a Range Of Values
Hiding Errors
Due Dates
Traffic Lights
A Simple Calendar
Restrictions
In Summary
Download

Basic Principles

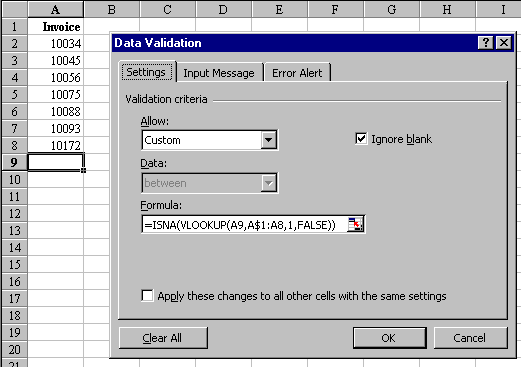
Conditional formatting is a facility accessed from the Format menu on the main Worksheet menu bar. When this option is selected, you are presented with the folowing dialog box:


Figure 1.

This allows the selection of a condition criteria, the default shown is the 'between' criteria but there is also 'not between', 'equal to', 'not equal to', 'greater than', 'less than', 'greater than or equal to', or 'less than or equal to'. After the criteria has been selected, appropriate value box(es) are shown to enable the input of the value to be tested. For instance, the 'between' option allows 2 values to be input, for obvious reasons, whereas the 'Equal to' option simply has one.

After setting the condition and the value, it is then necessary to set the format. Whilst it is possible to set font characteristics, borders, and cell patterns, in this discussion, I am only setting cell colours. I will leave it to you to experiment with the others, they are all accessed from the 'Format' button, as separate tabs.

As an example, consider highlighting any values greater than 100. The basic data is shown here in Figure 2.


Figure 2.

To implement the solution, select the data to be tested, enter conditional formatting as described above, select the 'greater than' condition from the list, and put 100 in the value box. Click the 'Format' button, select the 'Patterns' tab, and choose a colour to format the cell with. Exit conditional formatting and the result should be similar to Figure 3. below.


Figure 3.

Note that cells D6 and E10 are not highlighted, as we tested for greater than 100.

Row Striping

The previous example shows a simple use of conditional formatting, but it can be much more powerful than this. This power comes when using formulae within the condition criteria. An example is a worksheet with colour striping (just like the old computer printout paper that was common many years ago). This is useful to be able to read a very busy spreadsheet, separating rows for legibility.

Using the data from the previous example, we will add green stripes to every other row.

As before, select the rows to be tested, and enter conditional formatting. In the condition dropdown box to the left, the one that says 'Cell Value Is', select the other value, 'Formula Is'. This then presents a single text box for entering the criteria, as shown in Figure 4. below.


Figure 4.

To get row striping, add a formula of =MOD(ROW(),2)=0, click the 'Format' button, select the 'Patterns' tab, and choose a cell colour, such as 'Light Green'. Exit conditional formatting, and if all is well, your spreadsheet should look like Figure 5. below.


Figure 5.

This formula works by comparing the modulus of the row number and 2 against zero. If this test succeeds, the format is applied, if not, nothing happens.

Note that a formula of =MOD(ROW(),2)=1 would colour all of the odd numbered rows.

It is also possible to stripe every 3rd row, or every 4th row, etc. This is achieved by changing the value of the divisor argument to the 'MOD' function. So
=MOD(ROW(),3)=0 will stripe every 3rd row
=MOD(ROW(),4)=0 will stripe every 4th row
etc.

Similarly, it is simple to change which row the striping starts at. In this instance, the value that the 'MOD' fuction is being compared against is changed. The value tested against can be any value bewteen 0 and the divisor minus one, as these are the only values that the 'MOD' function will return. Examples are:
=MOD(ROW(),2)=1 will stripe every 2nd row, starting at row 1
=MOD(ROW(),3)=1 will stripe every 3rd row, starting at row 1
=MOD(ROW(),3)=2 will stripe every 3rd row, starting at row 2
=MOD(ROW(),4)=1 will stripe every 4th row, starting at row 1
=MOD(ROW(),4)=2 will stripe every 4th row, starting at row 2
=MOD(ROW(),4)=3 will stripe every 4th row, starting at row 3
etc.

The general formula is =MOD(ROW(),m+1)=MOD(n,m+1)
where m is the number of non-coloured (blank) rows between coloured rows, and n is the start row.

Column Striping

Column striping is just as easy as row striping, the 'COLUMN()' function is used within the 'MOD' function, rather than 'ROW()'. For example:
=MOD(COLUMN(),2)=1 will stripe every other row, starting at row 2.
The effect is as shown below in Figure 6.


Figure 6.

Identifying Top 3 In a Range Of Values

Another good use of conditional formatting is to pick out certain items on a spreadsheet amongst a large number of items, so as to highlight those that of most importance. This is especially useful when the data is being updated, thus the key items may not be in any fixed place on the spreadsheet.

Using the same worksheet as before, select the data cells, enter conditional formatting, select the 'Formula Is' condition, and input the following formula
=A1=LARGE($A$1:$H$18,1)
and set the format as required (in this example, I set the format to a red background, with bold white text).

To add further conditions for the second and third largest, click the 'Add >>' button, use a condition of 'Formula Is' with formulae of
=A1=LARGE($A$1:$H$18,2)
=A1=LARGE($A$1:$H$18,3)
and set the formats to the same as the top value. The conditional formatting dialog should then look like Figure 7. below.


Figure 7.

If this is all done successfully, the end result should be as in Figure 8.


Figure 8.

If wanted, each of the conditions could be formatted differently, to identify largest, second and third largest separately.

It would also have been possible to amalgate all 3 conditions into a single condition, using a formula of
=OR(A1=LARGE($A$1:$H$18,1),A1=LARGE($A$1:$H$18,2),A1=LARGE($A$1:$H$18,3))
What it cannot be is a single conditioon with a formula of
=A1=LARGE($A$1:$H$18,{1,2,3})
as conditional formatting does not support the use of array constants in the criteria.

Hiding Errors

Conditional formatting can even be used to hide errors, such as #DIV/0, divid by 0, or #NA, match not found.>/p>

Fig. 9 shows an example, with two columns where the errorsre hidden, two where the same erreors are not hidden.


Figure 9.

The errors are hidden by formatting the cell's font colour to white, which means they will not show against the cell background (of course if the cell colour is changed, the font colour should be changed to that colour.

To create this highlighting, follow these steps:

  • Step 1.
    Select all of the target rows in the 'State %ge' column, staring in row 2 (this example will use column G).

  • Step 2.
    Goto Menu Format>Conditional Formatting
    Change Condition 1 to Formula Is
    Add a formula of
    =ISERROR(G2)
    Click the Format button
    Select the Font Tab
    Select White from the Color dropdown
    OK

At this point, the conditional formatting dialog should look like this


Figure 10.

OK the dialog, and it is all done.

If specific errors need to be hidden, this can also be done as follows:

  • #N/A, #REF - test against the error function, =ISNA(G2) or =ISREF(G2)
  • all error types - test that error directly, such as =COUNTIF(G2,"#N/A") or =COUNTIF(G2,"#NAME?"). Note that it is necessary to get the error text correct in this way.

Whilst it may not be a good idea to just mask the errors, it might be better to fix the data, but it can be done, as shown.
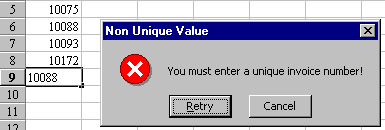
Due Dates

Conditional formatting is an ideal vehicle for highlighting due dates, showing items that are overdue, those shortly due, and those due later.

Fig. 11 shows the resultant highlights.


Figure 11.

In this example, we have a list of invoices, and the invoice due date. Highlighting is as follows:

  • red - items whose due date has passed
  • amber - items due within the next 2 weeks
  • green - items due within the next 3 months (or 12 weeks)

All other items are left without highlights.

To create this highlighting, follow these steps:

  • Step 1.
    Select all of the target rows in the 'Due Date' column, staring in row 2.

  • Step 2.
    Goto Menu Format>Conditional Formatting
    Change Condition 1 to Formula Is
    Add a formula of
    =B2
    Click the Format button
    Select the Pattern Tab
    Select red from the palette
    OK

  • Step 3.
    Goto Menu Format>Conditional Formatting
    Change Condition 1 to Formula Is
    Add a formula of
    =B2<=TODAY+2*7
    Click the Format button
    Select the Pattern Tab
    Select orange from the palette
    OK

  • Step 4.
    Goto Menu Format>Conditional Formatting
    Change Condition 1 to Formula Is
    Add a formula of
    =B2<=TODAY()+12*7
    Click the Format button
    Select the Font Tab
    Select the Pattern Tab
    Select green from the palette
    OK

At this point, the conditional formatting dialog should look like this


Figure 12.

OK the dialog, and it is all done.

If it is necessary to test a particular date, use a formula such as
=B2
which tests for a date less than 1st October 2007
OR
=B2
which tests for a date less than 3 months from today (3 months here, not 12 weeks).

Traffic Lights

Another useful technique that is used in management reports is to highlight the data using the 'traffic lights' technique, on target items are in green, items slightly slipping are shown in yellow, and big slippages are shown in red.


Figure 13.

The picture shows a number of national projects with a budget, cost to date, and estimated final cost. Thye will be flagged as follows:

  • green - estimated cost is less than or equal to budget
  • yellow - estimated cost.is less than or equal to budget + 25%
  • red - estimated cost is greater than budget + 25%

As well as showing the lights colours, the background is shaded to provide emphasis.

The conditional formatting will be formula driven, and to avoid showing a light on a blank line kit tests for no budget, as well as the spend status.

It would be very simple to do the highlighting by shading a cell, maybe the status cell or one of the amount cells, such as the budget. Whilst this works, it would be better to show as a traffic light shows it, a coloured circle. This is achieved by using the Winding font.

To create this traffic lights, follow these steps:

  • Step 1.
    Select the first data row in the 'Status' colum
    Set the font of this cell to 'Winding' Enter a lower-case letter l in the cell
    Centre the text in this cell
    Copy this cell down to the appropriate number of rows.

  • Step 2.
    Goto Menu Format>Conditional Formatting
    Change Condition 1 to Formula Is
    Add a formula of
    =AND(B2<>"",D2<=B2)
    Click the Format button
    Select the Font Tab
    Select bright green from the Color dropdown
    Select the Pattern Tab
    Select dark green from the palette
    OK

  • Step 3.
    Goto Menu Format>Conditional Formatting
    Change Condition 1 to Formula Is
    Add a formula of
    =AND(B2<>"",D2<=B2*1.25)
    Click the Format button
    Select the Font Tab
    Select yellow from the Color dropdown
    Select the Pattern Tab
    Select dark green from the palette
    OK

  • Step 4.
    Goto Menu Format>Conditional Formatting
    Change Condition 1 to Formula Is
    Add a formula of
    =AND(B2<>"",D2>B2*1.25)
    Click the Format button
    Select the Font Tab
    Select red from the Color dropdown
    Select the Pattern Tab
    Select dark green from the palette
    OK

At this point, the conditional formatting dialog should look like this


Figure 14.

OK the dialog, and it is all done.

A Simple Calendar

The final example of conditional formatting is a simple, one-page calendar. This calendar shows a month per column, and highlights weekdays, weekends, and today. The year is shown in a cell, changing the year will update the calendar automatically, all as a result of conditional formatting. Because the calendar is shown in a 12x31 grid, and not every month has 31 days, the inmvalid days are whitened-out, again using conditional formating. The finished result looks like Figure 11. below


Figure 15.

The picture shows buttons at the foot of the calendar that allow scrolling through the years, selecting today, and showing the selected date. This is achieved with VBA and is not described here, but the example workbook does have these functions.

To create this calendar, follow these steps:

  • Step 1.
    Open a new workbook
    Select B2:M32
    Put a box border around the selection
    Add vertical border lines
    Shade all cells with a light-green background.

  • Step 2.
    Put a year number in A1
    Add a named range to A1, menu Insert>Name>Define with a name of 'year'
    Put day numbers, 1-31, in A2:A32
    In B1 insert the formula
    =DATE(year,COLUMN()-1,1)
    format as 'mmm' and copy across to M1

  • Step 3.
    In B2, put formula
    =TEXT(DATE(year,MONTH(B$1),$A2),"ddd")
    and centre the cell
    Copy the formula to B2:M32

  • Step 4.
    Select B2:M32
    Menu Format>Conditional Formatting
    Change Condition 1 to 'Formula Is', add a formula of
    =DATE(year,MONTH(B$1),$A2)=TODAY()
    and format as red background
    Add condition, change Condition 2 to 'Formula Is' , add a formula of
    =MONTH(DATE(year,MONTH(B$1),$A2))<>MONTH(B$1)
    and format as white text and a white pattern
    Add condition, change Condition 3 to 'Formula Is', add a formula of
    =OR(WEEKDAY(DATE(year,MONTH(B$1),$A2),1)=1,WEEKDAY(DATE(year,MONTH(B$1),$A2),1)=7)
    format as pale blue background

  • Step 5.
    A bit of presentation, colour the headings etc.

Restrictions

Although conditional formatting is a very useful, very powerful facility, it does have some restrictions. It is not possible to use unions, intersections or array constants in the criteria. And possibly the severest restriction is that there are only 3 conditions allowed. Although this can be effectively increased to 4 by virtue of the default, that is anything that does not match any of the defined criteria, this is still severely limited. I would have expected Excel to have increased this by now, 10 would be much more useful, but it is still three, and so if you want more, you need to revert to VBA.

In Summmary

There it is, a few examples of conditional formatting that I hope demonstrate the power of this facility. It is all about presentation and useability, rather than adding to the spreadsheet calculation functionality, but that is a very important aspect of any spreadsheet and should not be overlooked.

It's usefulness will, as always, depend upon the creativity of you the user, and the appropriateness of its use. For example, whilst the calendar may in itself be of little value, it does show the level of complexity conditional formatting can be taken to.

As I come across more good uses of conditional formatting, I will post them on the website, and include them in the download. And, of course I would welcome suggestions/examples from others.

SUMPRODUCT

Multiple Condition Tests

One of the most basic functions in any spreadsheet is to return an answer based upon some condition. This becomes especially useful when counting or summing based upon that condition. One condition is useful, but multiple conditions extend the functionality and flexibility, so that you can count say the number of items sold by part number AND by month. There are a number of ways that this can be achieved within Excel, but this paper is focussing on one particular function, the SUMPRODUCT function, which by creative use has evolved a flexibility undreamt of by its originators in Microsoft.

SUMPRODUCT is one of the most versatile functions provided in Excel. In its most basic form, SUMPRODUCT multiplies corresponding members in given arrays, and returns the sum of those products. This page discusses the classic use of SUMPRODUCT, how creativity and inbuilt flexibility has enabled it to evolve into a far more useful function, and explains some of the techniques being deployed. Finally, some examples of SUMPRODUCT show its versatility.

Standard Use of SUMPRODUCT
Evolving Use of SUMPRODUCT
Advantages of SUMPRODUCT
SUMPRODUCT Explained
Format of SUMPRODUCT
Examples
References
Acknowledgments

Standard Use of SUMPRODUCT

In it's classic form, SUMPRODUCT multiplies each value in one array by the corresponding value in another array, and returns the summed result. As an example, if cells A9:A11 contain the values 1,2,3 and B9:B11 contain 10,20,30, then

=SUMPRODUCT(A9:A11,B9:B11)

returns 140, or (1*10)+(2*20)+(3*30)=10+40+90=140.

This is a useful function, but nothing more than that. A further, more 'creative' use of SUMPRODUCT has evolved, and is still evolving, driven as far as I can see mainly by the regular contributors of the Microsoft Excel newsgroups. This has been a creative and productive process that has significantly increased the useability of SUMPRODUCT, but in a way that you will not find documented in Excel's Help.

Evolving Use of SUMPRODUCT

Within Excel, there are two very useful functions that support conditional counting and summing, namely COUNTIF and SUMIF. Very useful functions, but limited in that they can only evaluate a single test range, and only a single test condition. Multiple conditions are so useful to test ranges (say between two dates), and double tests (one array = A and another = B), and whilst this can be managed using array functions
=SUM(IF(test_A,IF(test_B, etc.,
this is somewhat unwieldy, and is an array formula. And there is a better way, using SUMPRODUCT.

Note that in this section, all formulae given are using the '*' (multiply) operator format, but this in itself is one of the biggest discussion points around the SUMPRODUCT function, one which is discussed below.

To understand how SUMPRODUCT can be used, first consider the following data.

A

B

C

1

Make

Month

Price

2

Ford

June

7,500

3

Ford

June

8,300

4

Ford

May

6,873

5

Ford

June

11,200

6

Renault

June

13,200

7

Renault

June

14,999

8

BMW

June

17,500

9

BMW

May

23,500

10

BMW

June

18,000

Table 1.

We can easily count the number of Fords with
=COUNTIF(A1:A10,"Ford")
which returns 4.

Similalrly, it is straight-forward to get the value of Fords sold, using
=SUMIF(A1:A10,"Ford",C1:C10),
which gives 33,873.

How do we get a count of how many Fords are sold in June, or the value of them? The number can be calculated with
=SUM(IF(A1:A10="Ford",IF(B1:B10="June",1,0),0)),
which is an array formula so is committed with Ctrl-Shift-Enter, not just Enter. Similarly, the value is obtained with
=SUM(IF(A1:A10="Ford",IF(B1:B10="June",C1:C10,0),0)),
also an array formula.

But as this page is about SUMPRODUCT, you would expect that we could use that function in this case, and we can. The solution for the number of Fords sold in June using this function is
=SUMPRODUCT((A1:A10="Ford")*(B1:B10="June")).
The value is obtained with
=SUMPRODUCT((A1:A10="Ford")*(B1:B10="June")*(C1:C10))
In my view, this formula more readily shows what the objective is.

As a further extension of its use, we can use the '+' (plus) operator to count OR conditions, such as how many cars sold were either Fords, or were sold in June. This formula shows how
=SUMPRODUCT((A1:A10="Ford")+(B1:B10="June"))

Although array formulae are mentioned here, they are not explained. For a detailed discussion, see Chip Pearson's Array Formulas web page.

So far, so good, in that we have a versatile function that can do any number of conditional tests, and has an inbuilt flexibility that provides extensibility. Its power is augmented when combined with other functions, such as can be found in the examples below.

Advantages of SUMPRODUCT

Multiple conditional tests are a major advantage of the SUMPRODUCT function as descibed above, but it has two other considerable advantages. The first is that it can function with closed workbooks, and the second is that the handling of text values can be tailored to the requirement.

In the case of another workbook, the SUMIF function can be used to calculate a value, such as in
=SUMIF('[Nowfal Rates.xls]RATES'!$K$11:$K$13,">1")

This is fine in itself, and the value remains if the other workbook is closed, but as soon as the sheet is re-calculated, the formula returns #VALUE. Similarly, if the formula is entered with the other workbook already closed, a #VALUE is immediately returned.

SUMPRODUCT, however, overcomes this problem. The formula
=SUMPRODUCT(--('[Nowfal Rates.xls]RATES'!$K$11:$K$13>1),--('[Nowfal Rates.xls]RATES'!$K$11:$K$13))
returns the same result, but it will still work when the other workbook is closed and the sheet is re-calculated, and can be initially entered referencing the closed workbook, without a #VALUE error.

The second major advantage is being able to handle text in numeric columns differently. Consider the follwoing dataset, as shown in Table 2.

A

B

1

Item

Number

2

x

1

3

y

2

4

x

3

Table 2.

If we are looking at rows 1:4. we can see that we have a text value in B1 In this case it is simply a heading row, but the principle applies to a text value in any row.

Using SUMPRODUCT, we can either return an error, or ignore the text. This can be useful if we want to ignore errors, or if we want to trap the error (and presumably correct it later).

Errors will be returned if we use this version
=SUMPRODUCT((A1:A4="x")*(B1:B4))

To ignore errors, use this amended version which uses the double unary operator (see SUMPRODUCT Explained below for details)
=SUMPRODUCT(--(A1:A4="x"),(B1:B4))

But how does it work?

SUMPRODUCT Explained

To understand how SUMPRODUCT works will help you to determine where to use it, how you can construct your formula, and thus how you can extend it.

Table 3. below shows an example data set that we will use. In this example, the problem is to find how many Fords with a category of "A" were sold. A9:A20 holds the make, B9:B20 has the category, and C9:C20 has the number sold. The formula to get this result is
=SUMPRODUCT((A9:A20="Ford")*(B9:B20="A")*(C9:C20)).

The first part of the formula (A9:A20="Ford") checks the array of makes for a value of Ford. This returns an array of TRUE/FALSE, in this case it is
{TRUE,FALSE,TRUE,TRUE,TRUE,TRUE,TRUE,FALSE,TRUE,TRUE,TRUE,TRUE}

Similarly, the categories are checked for the vale A with (B9:B20="A"). Again, this returns an array of TRUE/FALSE, or
{FALSE,FALSE,TRUE,TRUE,FALSE,TRUE,TRUE,TRUE,TRUE,TRUE,TRUE,TRUE}

And finally, the numbers are not checked but taken as is, that is (C9:C20), which returns an array of numbers
{3,4,2,1,4,3,2,8,6,8,7,6}

So now we have three arrays, two of TRUE/FALSE values, one of numbers. This is showm in Table 4.

And this is where it gets interesting. SUMPRODUCT usually works on arrays of numbers, but we have arrays of TRUE/FALSE here as well as an array of numbers. By using the '*' (multiply) operator, we can get numeric values that can be summed. '*' has the effect of coercing these two arrays into a single array of 1/0 values. Multiplying TRUE by TRUE returns 1 (try it, enter =TRUE*TRUE in a cell and see the result), any other combination returns 0. Therefore, when both conditions are satisfied, we get a 1, whereas if any or both conditions are not satisfied, we get a 0. Multiplying the first array of TRUE/FALSE values by the second array of TRUE/FALSE values returns a composite array of 1/0 values, or
{0,0,1,1,0,1,1,0,1,1,1,1}.
This new array of 1/0 values is then multiplied by the array of numbers sold to give another array of numbers sold that satisfy the two test conditions. SUMPRODUCT then sums the members of this array to give us a count.

Table 4. below shows the values that the conditional tests break down to before being acted upon by the '*' operator. Table 5. shows a virtual representation of those TRUE/FALSE values as their numerical equivalents of 1/0 and the individual multiplication results. From this, you should be able to see how SUMPRODUCT arrives at its result, namely 35.

A

B

C

9

Ford

B

3

10

Vauxhall

C

4

11

Ford

A

2

12

Ford

A

1

13

Ford

D

4

14

Ford

A

3

`5

Ford

A

2

16

Renault

A

8

17

Ford

A

6

18

Ford

A

8

19

Ford

A

7

20

Ford

A

6

Table 3.

A

B

C

9

TRUE

*

FALSE

*

3

10

FALSE

*

FALSE

*

4

11

TRUE

*

TRUE

*

2

12

TRUE

*

TRUE

*

1

13

TRUE

*

FALSE

*

4

14

TRUE

*

TRUE

*

3

15

TRUE

*

TRUE

*

2

16

FALSE

*

TRUE

*

8

17

TRUE

*

TRUE

*

6

18

TRUE

*

TRUE

*

8

19

TRUE

*

TRUE

*

7

20

TRUE

*

TRUE

*

6

Table 4.

A

B

C

9

1

*

0

*

3

0

10

0

*

0

*

4

0

11

1

*

1

*

2

2

12

1

*

1

*

1

1

13

1

*

0

*

4

0

14

1

*

1

*

3

3

15

1

*

1

*

2

2

16

0

*

1

*

8

0

17

1

*

1

*

6

6

18

1

*

1

*

8

8

19

1

*

1

*

7

7

20

1

*

1

*

6

6

35

Table 5.

Table 6. below shows you the same virtual representation of 1/0 numerical values without the numbers sold column, that is using SUMPRODUCT to count the number of rows satisfying the two conditions, or
=SUMPRODUCT((A9:A20=A1)*(B9:B20="A"))